Version Controlling Your Data Science Projects
Historically I've been a huge advocate of Mathematica for scientific computing. The symbolic analysis made physics modeling a breeze, and I could quickly create attractive summary plots to be shared with my team. As I started looking at large datasets and collaborating with more engineers, however, Mathematica became more hinderance than help. As Code could not be easily version controlled, it would often end up emailed back and forth with the receiver having to manually check that they had all dependent files, as well as update file-paths to load data without errors.
Most of my coworkers were not familiar with Mathematica, and there wasn't justification in purchasing license seats just for them to open and run my files. All of this culminated in an environment where most data analysis bottlenecked through me and caused unnecessary slowdowns.
These issues sparked my conversion to Python for almost all analysis. As free, open-source software, anybody on my team can install it in minutes, and its popularity as a scripting language means nearly everybody we onboard has some Python experience. Today I'll be covering the repository structure I've adopted to make a data analysis workflow that anybody can easily use and contribute to. It assumes you have familiarity with the Python ecosystem and Jupyter Notebook environment, as well as a light understanding of Git.
Contents
Quick Links
What Makes this Structure Special?
Our new analysis flow is going to borrow extensively from the great open source tools that have come about for data science combined with best practices for software maintenance. In the end we will have a repository that can be extended for any data analysis project featuring:
A version controlled Git repository with hooks in place to only store code.
Jupyter notebook integration to perform the actual analysis.
A managed Python environment to keep track of dependencies.
Version controlled data which is stored separately from your code, but tracked in the main repository.
A clean, informative ReadMe enabling other users to download and run the same analysis.
Required Software
While most of the tools we use will be installed through Python's own package manager, there's a few pieces that need to be downloaded separately:
A Python Distribution - The base Python Interpreter. At the time of writing I recommend version 3.8, which is well supported. It's worth noting that if you are on Windows, the
pywinptypackage (required by Jupyter) only supports 64-bit Python, so make sure to download a 64-bit interpreter.Poetry - We'll use Poetry to manage virtual environments as well as make sure others can install the same package versions we're using (via the
poetry.lockfile).Visual Studio Code - While any text editor will work, VSCode's extensive Python support (including a Jupyter extension that runs a server in the editor) makes it a one-stop shop for data analysis.
Git - At the end of the day Jupyter notebooks are still code, and we want to exercise best software practices when writing them, version control included. Git can be daunting at first, but VSCode's Git integration means your commits can be done through the UI instead of command line.
Once everything is installed we're ready to set up the environment. Create a new folder that will hold the repository and open it in VSCode (Ctrl+K if you're already in VSCode).
Setting Up Our Python Environment
We want the packages we depend on to be isolated from the rest of the Python installation. Since Python dynamically links libraries at runtime, updating a package down the line (e.g. to install a different library with a newer dependency) might break your old code, or worse, introduce a subtle bug that you don't catch until much later. While we could go to an extreme and containerize all of our code, running it in a Docker Environment or similar, Python instead offers a simpler solution through virtual environments. If virtual environments are a new concept, I recommend reading the tutorial on python.org.
Easy Virtual Environments with Poetry
Poetry makes creating new environments easy with its poetry init command. This will ask a series of questions about your project which the tool will use to generate a pyproject.toml file. You can also choose to add any package dependencies when creating the environment. It's simple and often faster to add dependencies later, so I typically skip this step.
If there's not a console at the bottom of your VSCode window, open it with Ctrl+Shift+`, or Terminal -> New Terminal and run the initialization.
$ poetry init

This command will guide you through creating your pyproject.toml config.

Package name [data_analysis]:  my_awesome_analysis_repository
Version [0.1.0]:
Description []:
Author [Ryan Frazier <ryan@fotonixx.com>, n to skip]:
License []:
Compatible Python versions [^3.9]:  >3.8,<3.9

Would you like to define your main dependencies interactively? (yes/no) [yes] no
Would you like to define your development dependencies interactively? (yes/no) [yes] no
Once it's done, pyproject.toml will be generated in the root directory with the information you entered. By default Poetry will create the environment in a separate directory, but you can access it with poetry run. Test that your environment is running by executing poetry run py --version, and making sure it matches the version you specified.
Adding Common Dependencies
The specific packages you need will vary project-to-project, you'll almost always be using the Scientific Python Stack, so let's add it to our dependencies! We also need to install the Interactive Python (IPython) Kernel so we can register this environment as a Jupyter Kernel later. All of these can be installed using poetry's add command.
$ poetry add jupyterlab numpy scipy matplotlib pandas ipykernel
If you open pyproject.toml you'll see all those packages are now listed in the dependencies section. Additionally, Poetry created a poetry.lock file which is used to store the exact versions of every package and dependency in the environment.
Registering Our Environment as an IPython Kernel
Jupyter uses IPython Kernels running as a separate process to evaluate cells. In order for Jupyter to use our newly created virtual environment, we need to register it with a kernel using the ipykernel package. Run the below command, replacing name and display-name with appropriate values for the project.
$ poetry run python -m ipykernel install --user --name project_x_env --display-name "My Awesome Data Science Environment"
Now you can Launch Jupyter from any environment, including the global environment, and still access this environment's packages. If you don't have Jupyter installed globally, you can run the installation in our environment by executing poetry run jupyter lab. Alternatively, creating and opening an *.ipynb file in VSCode will enable the data science view.
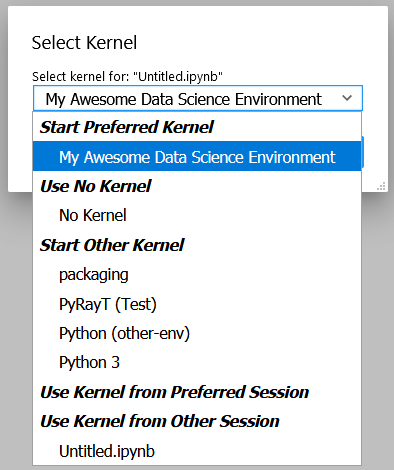
Our newly created Kernel as a selectable option
Adding Version Control
You might be wondering why a data analysis project needs version control, or what version control even is. To quote Atlassian:
"Version control software keeps track of every modification to the code in a special kind of database. If a mistake is made, developers can turn back the clock and compare earlier versions of the code to help fix the mistake while minimizing disruption to all team members."
Sounds pretty great, right?! If you still need convincing: imagine you're toying with a new way to look at data but you don't want to delete your current method. Instead of copying the file into a new one, you can create a branch and merge the changes if they work, or delete them if not. Not only that but you can have multiple people simultaneously looking at the data, each person focused on their specific tasks, with all changes merged at the end.
Making a New Repository
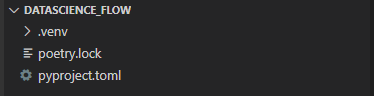
To keep things simple we'll use VSCode's Git plugins to create, commit to, and push our repository. On the left side of the VSCode window you should see the directory structure with the pyproject and poetry.lock files. Depending on your Poetry settings the virtual environment may also be in this base directory.
Open the Command Pallette (Ctrl+Shift+P or f1 on Windows) and type "git init". There should be only one option that reads "Git: Initialize Repository". Press Enter and select the current folder to initialize the repository.
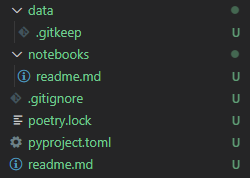
Notice that pyproject.toml and poetry.lock have turned green in the Explorer (Ctrl+Shift+E)! This is because VSCode knows you have a repository in the directory and that those files have not been staged for a commit. If you open the Source Control Panel (Ctrl+Shift+G) you'll see both those files listed as changes with a "U" on the right meaning they're unstaged. Before staging and making our initial commit, however, we want to add a few more files that will help flesh out the repository. These include:
a
readme.mdfile in the base directorya
.gitignorefile in the base directorya new directory
/notebooks/with areadme.mdinside of it.a
/data/directory with an empty.gitkeepfile inside of it.
When you've added the files your project directory should look similar to below:
Choosing which Files to Ignore
Git uses the .gitignore file to black-list specific files or even entire directories from being captured into version control. This helps keep the repository size small and only commit files that are necessary to reproduce the environment. As a rule of thumb the following should be excluded from your commits:
Any IDE settings (the
./.vscode/directory )Auto-generated files (
*.pyc, file backups etc.)User specific environment files
Large files that don't often change (downloaded datasets, third-party libraries)
It might seem alarming that datasets should not be part of version control, after all you have nothing to analyze without data! Further down we'll talk about how to synchronize data with the repository, but for now we'll ignore all files in the /data/ directory except for our whitelisted .gitkeep file.
# Ignore data directories
/data/*
!/data/.gitkeep
The rest of our .gitignore file is built off of GitHub's python.gitignore with the above additions to ignore our data directory, as well as VSCode settings, and Jupyter backup files. The entire file can be found here.
Creating a Git Hook to Prevent Messy Commits
While I love Jupyter for exploration and data analysis, one thing that always bothers me is how the code lives in the same file as evaluated evaluated output. When version controlling notebooks this can cause issues for a couple of reasons:
If the data you're working on is private but the code is public, the private data could end up in an output and committed, available for anybody to see.
Git works by logging differences in your file. This includes things like cell number, cell output, and picture metadata, if you version control an evaluated notebook you'll have unstaged changes as soon as you evaluate a cell, even though none of the written code actually changed!
We want a way to scrub our notebooks of all evaluated output before committing them. To do so we'll use githooks which are custom scripts that run when you perform a Git command. Flipping through the Githook documentation, the pre-commit hook is exactly what we need. Unfortunately, installing a Githook is a manual process that requires you to add a file to your /.git/ directory.
In order to make it as easy as possible for anybody to use this template, as well as make writing the githook simple, we'll instead use the pre-commit python package and write our hook with a YAML file that will live in the root of our version control. The pre-commit config we'll be using comes from Yuri Zhauniarovich's blog and uses nbconvert to scrub the output in-place.
Let's add pre-commit and nbconvert to our poetry environment. Since it's not needed to actually run the notebooks, and will only be used by people contributing to the codebase we'll install them as developer packages.
$ poetry add pre-commit nbconvert --dev
To define the hook, a new file in the base directory called .pre-commit-config.yaml and add the following text:
repos:
  - repo: local
    hooks:
      - id: jupyter-nb-clear-output
        name: jupyter-nb-clear-output
        files: \.ipynb$
        stages: [commit]
        language: system
        entry: poetry run jupyter nbconvert --ClearOutputPreprocessor.enabled=True --inplace
The last piece is to install the githook so that it's run before every commit. Pre-commit makes this easy for us with it's install argument.
$ poetry run pre-commit install
pre-commit installed at .git\hooks\pre-commit
This is a good spot for our first commit! We've fleshed out the repository, filled our .gitignore and added most of our template files (even if they are empty). To commit using VSCode we'll again use the Source Control Panel (Ctrl+Shift+G). You can manually stage files by pressing the "+" icon to the right of the files, or you can stage all changes by clicking the "+" to the right of the "Changes" drop-down.
All commits should have a meaningful message so that you can look back and quickly understand what was changed. Chris Beam's Blog has a great post on the importance of a good commit message and how to write one, but for our first commit message we'll keep it simple with "initial commit".
With the files staged and commit message filled out, press the check-mark at the top of the panel to commit the changes.
Version Controlling Data
Next comes adding data to the repository. Copy any necessary data files over to the /data/ directory we made earlier. You can have a nested directory tree inside of that directory so organize it into a structure that works for you. Looking at the Explorer panel you'll notice all these files are greyed out and don't show up if you tab over to the Source Control panel. Since /data/ is ignored every file and folder below is is subsequently ignored as well.
Why Don't We Store Everything in the Git Repository?
To understand why we wouldn't want to store our large data files in a Git repository, lets peel back what happens when you clone an existing repository onto your local system. From Atlassian's Git-LFS tutorial:
"Git is a distributed version control system, meaning the entire history of the repository is transferred to the client during the cloning process. For projects containing large files, particularly large files that are modified regularly, this initial clone can take a huge amount of time, as every version of every file has to be downloaded by the client."
The solution to this problem is to not version control the large files at all, but instead version control small reference files that tell you where the data lives so you only check-out the version you want, instead of the entire history. Git-LFS (Large File System) is one implementation of this strategy, but we're going to instead use the Data Version Control (DVC) Python package, which is specifically designed with data-analysis in mind.
Setting up DVC
Since DVC is a Python package, we can install it with Pip just like our other dependencies. The assumption is anybody using our repository will want access to the data, not just developers, so we won't both with the --dev flag either.
$ poetry add dvc
DVC is designed to mimic a Git workflow, so many of the commands you'd use for Git have DVC parallels. For example, to initialize DVC in our repository and add the data directory we use the init and add commands respectively.
$ poetry run dvc init
$ poetry run dvc add ./data/
~~~
To track the changes with git, run:
        git add data.dvc .gitignore
Notice the final output after adding the data directory, DVC is telling us that it's created a new file called data.dvc that's tracking changes to our data directory. It's also updated .gitignore automatically for us to ignore /data/ (Our previously committed .gitkeep will not be ignored since it's already tracked). DVC's offering a convenience in case we had forgotten to ignore the directory ourselves, but since we already had, let's revert our .gitignore to its previous state. In the Source Control Panel, right-click .gitignore and select "Discard Changes". This will reset the file to its state in the previous commit.
If you add new data to the directory, you can update data.dvc by running dvc add ./data/ again. Make sure to commit data.dvc as soon as you add new data, otherwise committed notebooks might lose sync with the data changes.
Adding a Remote
DVC allows you to back-up version-controlled data to remote servers, perfect for enabling multiple users to access the same version of a dataset. From the documentation:
The same way as GitHub provides storage hosting for Git repositories, DVC remotes provide a location to store and share data and models. You can pull data assets created by colleagues from DVC remotes without spending time and resources to build or process them locally. Remote storage can also save space on your local environment – DVC can fetch into the cache directory only the data you need for a specific branch/commit.
Using DVC with remote storage is optional. DVC commands use the local cache (usually in dir .dvc/cache) as data storage by default. This enables the main DVC usage scenarios out of the box.
I recommend setting up a default remote even if you're the only one looking at the dataset. Mine are usually directories on an internal network drive, but DVC has support for multiple storage types, so use whichever structure works best for you. The remote can even be a separate directory on you computer.
Once the remote is set-up, pushing to it is as simple as running dvc push <remote>. To pull from your remote you similarly run dvc pull <remote>.
Document Everything with a ReadMe
A good ReadMe will elevate your repository from "that collection of code that only you know how to use" to "an easily understood project that anybody can contribute to." Think of the ReadMe like a lab report with instruction on how to reproduce the analysis, it should:
Clearly summarize the goal of the repository.
-
Explain how to duplicate the code on a user's machine. This includes:
Installing required software (Python, Poetry, etc.).
Creating the Virtual Environment and installing necessary packages.
Registering the Environment with Jupyter.
Pulling data from the DVC remote.
Explain how to run the analysis, with a description of what each notebook does and what results it will generate.
-
Give clear instructions for how users can contribute to/extend the repository:
Installing the additional developer dependencies.
Making sure the githook is set-up so only clean files are committed.
I'm a big fan of othneildrew's Best ReadMe Template and use it for most of my projects. A modified version can be found on the example repository which covers all of the above requirements.
Remember we also had a second ReadMe in the /notebooks/ directory which we'll use to describe each notebook in greater detail. You can even include example plots and outputs that the notebooks should generate. GitHub will show a rendered ReadMe in every directory that has one, so you can even group all your notebooks into separate subdirectories, and have a specific ReadMe explaining the purpose of every group!
With data added, committed, and ReadMe's filled in it's time for our next commit! Stage all the changed files and give it a meaningful message: e.g. highlight what data was added and where it came from. Be sure to follow the 50-72 rule so your messages stay meaningful and concise.
This is a great time to push your commits up to your favorite server. If VCS is completely new to you, I'd recommend GitHub for its sheer popularity and option to make both public and private repositories with a free account.
What's the Workflow Look Like?
With the repository set up, it's time to outline how to use it for analysis. While at the end of the day you should do whatever is natural for your team. I recommend adopting a modification of the Gitflow workflow:
No work is done in the main branch of the repository.
When you have a new task, make a branch off of
mainand do all of your work in that new branch.All notebooks should live in the
/notebook/directory. Use subdirectories to group similar notebooks.When the task is finished, clean up the branch and update the ReadMe to describe any new files. Depending on how formal your team is, manually merge the branch back into
mainor submit a pull-request.
This structure ensures that analysis tasks are done in isolated environments and only merged back when they're finalized, and you don't need to constantly worry about pulling from the main branch and resolving merge requests.
How to Save Results
This repository structure does a great job making sure analysis is done in a clear, reproducible matter, but I haven't touched on how to actually save results. In fact, because of our commit-hook, even if your VCS server rendered Jupyter notebooks (and many do) there would be no output and only code! How do we actually save results in a format that can be looked back on? This will vary from person-to-person, but I like to create a /results/ directory and use Sphinx to create a static website with a new page for each result. Be sure to populate them with saved images and hard coded values so that the results persist even if you edit the code later on.
Static site generation with Sphinx can easily be integrated into a CI/CD workflow and Github even offers free hosting of static pages. Look into gh-pages for an easy way to deploy your pages into a GitHub hosted Static site.
This entire template can be found on my GitHub, feel free to fork it for your own projects and submit requests for additional features!